Customizing Generated Code
ZenWaveSDK adapts to your team's coding style, preferences and custom libraries.
ZenWave SDK arose from a personal need to have an analysis and design tool that could generate projects, initially Java and Spring-Boot, with sufficient flexibility to adapt to the needs of each project, team, and client.
By default, ZenWaveSDK generates a complete SpringBoot backend application following industry best practices, with a minimal dependency set: Spring-Data JPA and MongoDB, SpringMVC, SpringCloudStreams, MapStruct and optional Lombok integration.
You can customize the generated code in several ways:
Basic Customization:
- Architecture layouts: Choose between different architectural styles (layers, clean/hexagonal, simple packaging)
- Package configuration: Customize the structure of generated packages
- Modular monoliths: Configure multiple modules sharing common base classes
Intermediate Customization:
- Custom templates: Modify specific templates for small adjustments (annotations, custom starters, etc.)
Advanced Customization:
- Classpath extension: Add custom dependencies and plugins via JBang
- Total customization: Example of complete substitution replacing Java with Kotlin
- Plugin creation: Develop completely new plugins for specific cases
NOTE: The less customization you need, the less effort you'll spend creating and maintaining it.
Configuring different Project Layouts
By default, ZenWave SDK generates a Spring Boot/Spring Cloud backend application using a flexible hexagonal/clean architecture approach. However, the toolkit offers several alternative layouts to match your preferred architectural style:
config {title "My Backend Application"basePackage "com.example.my.backend"// Available layout options:// - DefaultProjectLayout// - CleanHexagonalProjectLayout// - LayeredProjectLayout// - SimpleDomainProjectLayout// - HexagonalProjectLayout// - CleanArchitectureProjectLayoutlayout CleanHexagonalProjectLayout}
You can customize any package path in your chosen layout through properties in the config section or as parameters in the CLI plugin:
config {//...layout CleanHexagonalProjectLayoutlayout.entitiesPackage "{{basePackage}}.core.model"layout.openApiApiPackage "{{basePackage}}.web"layout.openApiModelPackage "{{basePackage}}.web.dtos"}
For a complete customization, you can create your own implementation of the ProjectLayout class.
Tip: You can organize your application into multiple modules, each using a different layout.
CleanHexagonalProjectLayout
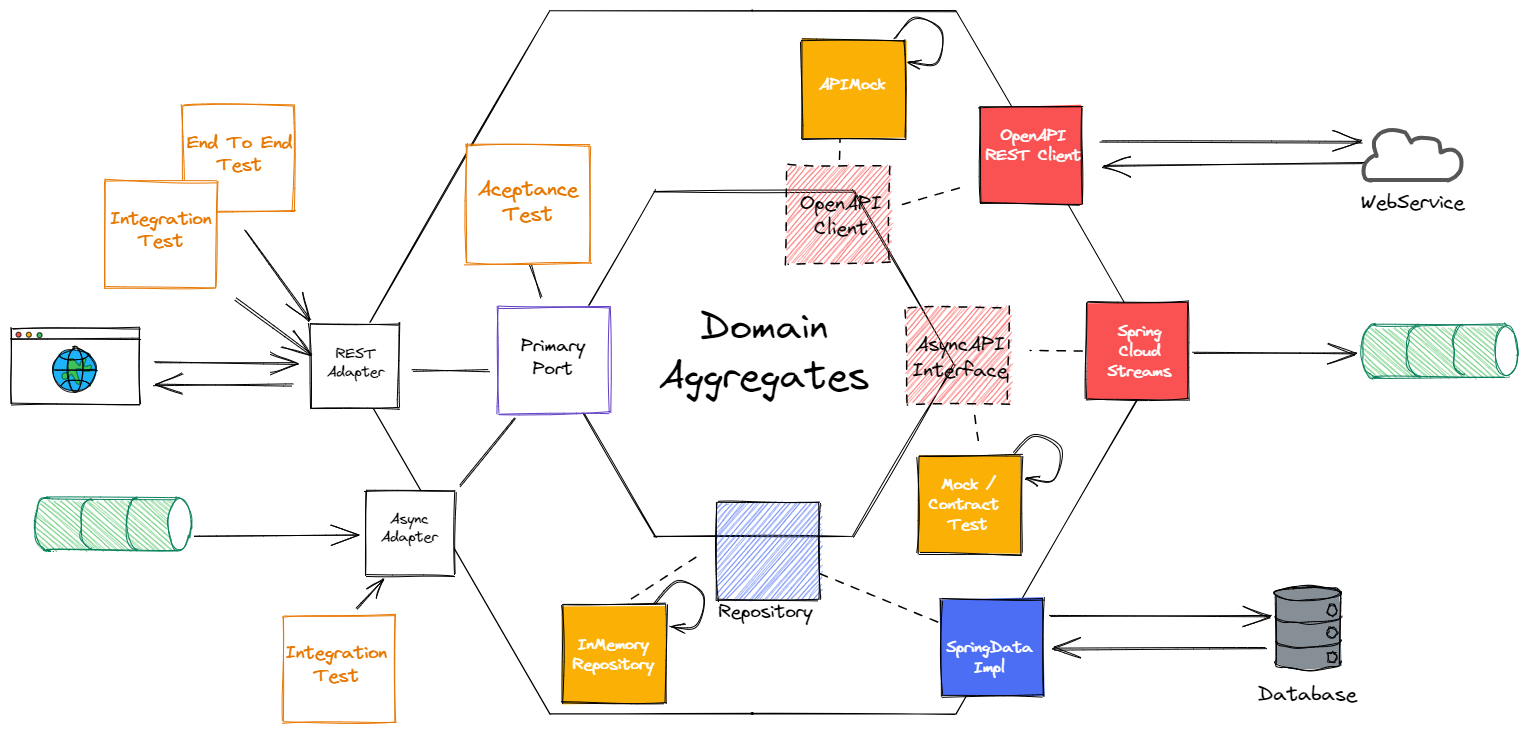
This is the default project layout, which the source code templates are designed around. It implements a pragmatic hexagonal/clean architecture with:
- A central
corepackage containing domain entities and aggregatesinbound(primary ports) andoutbound(secondary ports) interfaces- and the internal
implementationofinboundinterfaces, which uses theoutboundinterfaces to interact with external services.
CleanHexagonalProjectLayout
/*** Hexagonal Architecture (also called Ports and Adapters) with a Clean separation of concerns, following Domain-Driven Design (DDD) and Event-Driven Architecture (EDA) principles.** <pre>* 📦 {{basePackage}}* 📦 adapters* └─ web* | └─ RestControllers (spring mvc)* └─ events* └─ *EventListeners (spring-cloud-streams)* 📦 core* ├─ 📦 domain* | └─ (entities and aggregates)* ├─ 📦 inbound* | ├─ dtos/* | └─ ServiceInterface (inbound service interface)* ├─ 📦 outbound* | ├─ mongodb* | | └─ *RepositoryInterface (spring-data interface)* | └─ jpa* | └─ *RepositoryInterface (spring-data interface)* └─ 📦 implementation* ├─ mappers/* └─ ServiceImplementation (inbound service implementation)* 📦 infrastructure* ├─ mongodb* | └─ CustomRepositoryImpl (spring-data custom implementation)* └─ jpa* └─ CustomRepositoryImpl (spring-data custom implementation)* </pre>*/
Notes about Generated Clean/Hexagonal Architecture
To balance pragmatism with architectural purity, this implementation makes two practical compromises:
- Domain entities directly use JPA or SpringData MongoDB annotations
- Spring Data Repository interfaces serve as outbound adapters/secondary ports, while their implementations remain outside the core domain
These design choices significantly reduce the complexity of your codebase by minimizing the number of mappers and DTOs needed, while still maintaining the key benefits of hexagonal/clean architecture - clear separation between core domain and external systems.
For testing, ZenWave SDK provides in-memory implementations of Spring Data Repository interfaces, eliminating the need for a database or mocking frameworks. This demonstrates that your core business logic remains decoupled from specific persistence technologies.
If you believe your project genuinely requires the ability to swap persistence implementations (a rare need in most applications), and you're willing to accept the additional complexity of extra mapping layers, you can create custom templates as described in the Full Source Code Customization section.
LayeredProjectLayout
This is the classical layered architecture with domain, repository, events, commands, service and web layers.
LayeredProjectLayout
/*** Simple domain project layout.** <pre>* 📦 {{basePackage}} # Root package* 📦 config # Spring Boot configuration, security, etc.* 📦 domain # Domain Layer (Business Entities and Events)* ├─ *Entities* └─ events/* └─ *DomainEvents* 📦 repository # Repository Layer (Persistence and Data Access)* ├─ {{persistence}}/* | ├─ *RepositoryInterface # Persistence interface (Spring Data, etc.)* | └─ *RepositoryImpl # Repository implementation* 📦 events # Events Layer (Internal and Async API Events)* ├─ *EventListeners # Event listeners* 📦 commands # Command Layer (Command Handlers)* ├─ *CommandHandlers # Command handlers (e.g., CQRS commands)* 📦 service # Service Layer (Business Logic and DTOs)* ├─ dtos/* | └─ *DTOs # Data Transfer Objects* ├─ impl/* | └─ *ServiceImplementation # Service implementations* └─ impl/mappers/* └─ *Mappers # Object mappers for transformations* 📦 web # Web Layer (Controllers and API)* ├─ *RestControllers # REST controllers (Spring MVC, etc.)* └─ mappers/* └─ *WebMappers # Mappers for web layer transformations* </pre>*/
SimpleDomainProjectLayout
This is a very simple and flat structure, with no particular layering. It's useful for small services or modules with just one entity or aggregate.
SimpleDomainProjectLayout
/*** Simple domain project layout.** <pre>* 📦 {{basePackage}}* └─ 📦 config* └─ 📦 model (entities and aggregates)* └─ 📦 dtos* └─ 📦 events* ├─ 📦 mappers* ├─ *EventListeners (spring-cloud-streams)* ├─ *RestControllers (spring mvc)* ├─ ServiceImplementation* └─ *RepositoryInterface* </pre>*/public class SimpleDomainProjectLayout extends ProjectLayout {{basePackage = "{{basePackage}}";// in case of modular projectconfigPackage = "{{basePackage}}.config";commonPackage = "{{basePackage}}"; // set to "{{basePackage}}.common" in modular projectsmodulesPackage = "{{basePackage}}.modules";// module specificmoduleBasePackage = "{{basePackage}}";moduleConfigPackage = "{{moduleBasePackage}}.config";// domain entities and eventsentitiesPackage = "{{moduleBasePackage}}.domain";
HexagonalProjectLayout
This layout follows a stricter naming convention for hexagonal architecture, with domain, ports, application core, and adapters.
HexagonalProjectLayout
/*** Hexagonal project layout.** <pre>* 📦 {{basePackage}}* 📦 domain # Domain model (Entities, Aggregates, Value Objects)* └─ *Entities* |* 📦 ports # Port interfaces* ├─ inbound # Primary ports (driving adapters)* | └─ UserServicePort # Interface for business logic (input)* └─ outbound # Secondary ports (driven adapters)* └─ UserRepositoryPort # Interface for persistence (output)* |* 📦 application # Application core (business logic services)* ├─ services # Service implementations* | └─ UserServiceImpl # Implements UserServicePort, uses UserRepositoryPort* └─ mappers # Optional: Mapping between entities and DTOs* |* 📦 adapters # Interface adapters (controllers, repositories, listeners)* ├─ web # Web adapter (e.g., REST)* | └─ UserController # Calls UserServicePort* ├─ persistence # Persistence adapters* | ├─ mongodb/* | | └─ MongoUserRepository (implements UserRepositoryPort)* | └─ jpa/* | └─ JpaUserRepository (implements UserRepositoryPort)* └─ events # Event-driven adapters* └─ UserEventListener # Listens to events, calls UserServicePort* |* 📦 config # Spring Boot configurations* </pre>*/
Modular Monoliths
Initially, ZenWave SDK was designed to generate microservices, although nothing prevents using it to generate modules of a monolith.
The main peculiarity when building modular monoliths is sharing base classes between different modules to avoid code duplication.
For monolithic projects, it's necessary to configure the module's base package name, which will be the root package of all packages generated by ZenWave SDK (equivalent to basePackage in microservices).
// Module-specific configurationconfig {title "Customer Module"layout CleanHexagonalProjectLayoutlayout.moduleBasePackage "io.zenwave360.example.modules.customers"}
And also configure the base packages to share classes between modules, as they will probably be at a higher level than the modules themselves.
// Common configuration for all modulesconfig {title "Modular Monolith"basePackage "io.zenwave360.example"// Packages shared between moduleslayout.commonPackage "{{basePackage}}.common"layout.infrastructureRepositoryCommonPackage "{{commonPackage}}"layout.adaptersWebMappersCommonPackage "{{commonPackage}}.mappers"}
See:
For two examples of modular monoliths generated with ZenWave SDK, in Java and Kotlin, respectively.
Intermediate Customization
Custom Templates
For specific modifications without creating a complete plugin, you can override individual templates:
Process:
- Locate the original template in the ZenWave SDK repository
- Copy the template to
.zenwave/templates/[original-path]in your project root folder - Modify the content according to your needs
Example: Customize Spring Data repositories with file like this:
.zenwave/templates/io/zenwave360/sdk/plugins/BackendApplicationDefaultGenerator/src/main/java/core/outbound/jpa/imperative/EntityRepository.java.hbs
// .zenwave/templates/io/zenwave360/sdk/plugins/BackendApplicationDefaultGenerator/src/main/java/core/outbound/jpa/imperative/EntityRepository.java.hbspackage {{layout.outboundRepositoryPackage}};{{~assign 'aggregate' (findEntityAggregate entity.name)}}import {{layout.entitiesPackage}}.*;import java.math.*;import java.time.*;import java.util.*;import org.springframework.data.jpa.repository.*;import org.springframework.stereotype.Repository;/*** Spring Data JPA repository for the {{entity.className}} entity.*/@Repository@MyCustomRepositoryAnnotationpublic interface {{entity.className}}Repository extends MyCustomBaseRepository<{{entity.className}}, {{idJavaType}}> {{{~#if aggregate}}default Optional<{{aggregate}}> find{{aggregate}}ById({{idJavaType}} id) {return findById(id).map({{aggregate}}::new);}{{~/if}}{{~#if (naturalIdFields entity)}}{{{naturalIdsRepoMethodSignature entity}}};{{/if}}}
Notice @MyCustomRepositoryAnnotation and extends MyCustomBaseRepository added to the template.
Limitations: This approach allows modifying templates but not adding new helpers or changing generation logic.
Advanced Customization
Importing Custom Maven Artifacts
Custom Maven artifacts can be used to extend, replace, or override the default behavior of ZenWave. These artifacts may contain:
- Handlebars templates that override existing templates
- Alternative implementations of existing Java classes
- New plugins not included in the default distribution
- Additional customizations such as helpers, generators, or conventions
When present, these imported artifacts are loaded before parent classpath so they take precedence over built-in components.
You can import custom Maven artifacts by adding them to the jbang command line using the --deps option, for example:
jbang --deps=org.example:custom-artifact:1.0.0 \zw -p BackendApplicationDefaultPlugin zdlFile=zenwave-model.zdl
Alternatively, if you are using the ZenWave Editor IntelliJ Plugin , you can declare the dependency directly in your .zw file:
@import("org.example:custom-artifact:RELEASE")config {//...}
When running plugins from .zw files, ZenWave Editor automatically resolves these imports and adds them to the underlying jbang execution.
Classpath Extension with JBang
You can also extend the classpath by creating a custom jbang-catalog.json file in the project root, which would override ZenWave SDK's classpath when invoked from that directory:
{"catalogs": {},"aliases": {"zw": {"script-ref": "io.github.zenwave360.zenwave-sdk:zenwave-sdk-cli:RELEASE","dependencies": ["org.slf4j:slf4j-simple:1.7.36","<your-custom-dependency>",// ... standard ZenWave dependencies],"main": "io.zenwave360.sdk.Main"}}}
Important note: Dependencies added at the beginning will override ZenWave SDK classes.
Total customization: Example of complete substitution replacing Java with Kotlin
ZenWave SDK allows total customization. In fact, it includes a complete customization that replaces Java with Kotlin.
You can check the Kotlin customization source code to see how it's implemented.
In practical terms, to use the Kotlin customization, simply configure the templates option with the corresponding class in the following plugins:
@import("io.zenwave360.sdk.plugins.customizations:kotlin-backend-application:RELEASE")config {zdlFile "zenwave-model.zdl"plugins {BackendApplicationDefaultPlugin {templates "new io.zenwave360.sdk.plugins.kotlin.BackendApplicationKotlinTemplates()"}OpenAPIControllersPlugin {openapiFile "src/main/resources/public/apis/openapi.yml"templates "new io.zenwave360.sdk.plugins.kotlin.OpenAPIControllersKotlinTemplates()"}SpringWebTestClientPlugin {openapiFile "src/main/resources/public/apis/openapi.yml"templates "new io.zenwave360.sdk.plugins.kotlin.SpringWebTestClientKotlinTemplates()"}}}
You can find several complete examples of Kotlin projects generated by this customized templates in https://github.com/ZenWave360/zenwave-playground/
Creating Custom Plugins
For specific needs, you can create completely new plugins that generate any type of artifact: code, APIs, documentation, tests...
Available tools:
- ZDL Parser
- OpenAPI/AsyncAPI Parser with reference resolution
- Java code formatters (Google, Palantir, Spring) and Kotlin (ktfmt)
- Handlebars template engine
You can base your work on any existing plugin and/or use the ZdlToJsonPlugin Plugin to inspect the ZDL model structure and understand the transformations needed to achieve your goal.
jbang zw -p ZdlToJsonPlugin zdlFile=zenwave-model.zdl
The best way to start is to fork an existing plugin and modify it to suit your needs. You can find all available plugins in the ZenWave SDK repository.